Monday, August 31, 2009

Brioche


This brioche is a really special kind of bread which is best for french toast, but you can also eat it by itself or make that cinnamon toast my husband likes.
After making this brioche I realized that it resembles a lot one of the Christmas traditional dessert from Europe. What sets them apart is the filling.
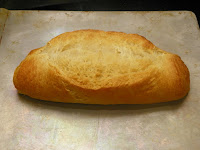
Anyway, with very few ingredients and with a little bit of patience you can end up with a beautiful baked loaf of brioche.
The crumb will be beautifully puffed up with large holes and the taste will be just amazing - not too sweet, not too cake like.
Just yum.
Let's get bakin' !

Ingredients:
300-350 gr flour
8 gr instant yeast
1/4 cup milk
2 eggs, beaten
3 tbsp brown sugar
6 tbsp butter, room temperature
1/2 teaspoon salt
1 egg yolk or a few TBSP of milk combined with some sugar - for glaze

Directions:
Dissolve the yeast into the milk, then add the rest of the ingredients, making sure you add the salt at the end.
Thy say that having salt in direct contact with the yeast - kills the yeast and you do not want that.
Knead 10 minutes and let rest for 35-60 minutes.
Punch it down and pat it so you can flatten it.
Roll the dough and place it into a greased loaf pan, 5 by 10 inches if possible.
Keep in mind that the brioche will double, even triple in volume.
Let it rise for at least 45 more minutes.
Glaze it and bake at 350 F for 30-40 minutes.
If it starts to brown too quickly, cover with aluminum foil.
Make sure the pan is placed in the middle of the oven.
After the baking time, let the brioche sit in the pan for approx. 5 minutes, then remove it and let it cool on a cooling rack.
Keeps well in a ziplock plastic bag, at room temperature or in the fridge.
Good luck !

Sunday, August 30, 2009

How about some Chicken Chili ?


I know that Jeff, my husband, likes chili and he also likes chicken (boneless and skinless is a must), so the chicken chili I decided to make for him was just perfect !
I have seen many many chili recipes in the last half of year and I know that 90% of them call for ground meat - beef mostly.
I decided to use chicken thighs, cut into smaller than bite size pieces and it was a good decision.
I did not use anybody's recipe, as I thought it is best to just come up with one myself.
Jeff loved it.
:)
Oh, by all means, if you decide to give it a try, go ahead and use any type of meat that you like.

Ingredients:
2-3 chicken thighs
1 carrot
1/3 - 1/2 bell pepper
1 medium red onion
1/2 parsnip
1/2 cup corn kernels
one 14 oz diced tomatoes zesty chili style
1 teaspoon hamburger seasoning
1 teaspoon kosher salt
1/2 teaspoon ground cumin
dash of ground pepper
4 TBSP oil
2 TBSP diced parsley or cilantro
1 cup dry beans (wash, rinse, boil them in 6 cups water for 1.5-2 hours)

Directions:
If you decide to use dry beans, boil them, drain and set aside.
Or, for convenience, go ahead and use a can of store bought beans.
I used red kidney beans, but I do not think it matters all that much which type you use.
Dice the vegetables/legumes and set aside in a bowl.
Cut the meat into pieces and set aside in another bowl.
Place the oil in a saucepan, heat it up a few minutes, then add the meat and the vegetables to it and cook for 5-10 minutes on medium high heat stirring often with a plastic/wooden spoon.
By this time the meat should be cooked already.
Now open the can of diced tomatoes and add them to the contents of the saucepan, along with all the spices/condiments.
Bring to a boil, cover, lower the heat to medium-low and let simmer for 10 minutes.
Add the beans and stir.
If you wish, you can again bring the mixture to a boil then remove from heat or you can simply remove from heat after adding the beans.
Stir in the parsley at the end.
Serve it with some cheese on top and flat bread.
Easy, wasn't it ?

Friday, August 28, 2009

Hummus


They say that hummus is always better to make at home, as the one bought at the store may not taste as good.
So I had to try making my own - at home. From scratch.
That also meant boiling my own garbanzo beans / chickpeas.
Easy enough, as I had the beans in the pantry so all I had to do was measure 1 cup of beans, boil them for 2 minutes, then let them sit in the hot water for 1 hour.
Easy !

I had the rest of the ingredients in the house and it so happened that I made some flat bread the same afternoon - so it was all just fitting into place. All I had to do was to place all the ingredients into the food processor. Which I did.
Let's get cooking !

Ingredients:
1 cup garbanzo beans (chickpeas) dry or 1 can of garbanzo beans, drained and rinsed
2 garlic cloves
2-3 TBSP sesame seeds
1/4 cup oil (olive oil if you have)
1/2 teaspoon salt
1/4 teaspoon pepper
juice of half of a lemon
*** you can also add chili powder or any other spices you like
***you can pulse 1 roasted bell pepper along with the beans
***you can add red pepper flakes too

Directions:
If you chose the dry garbanzo beans, rinse them well, then cover with water and boil for 2 minutes, then let sit in the water for 1 hour. Rinse and they are ready to use.
If you have a can of garbanzo beans, pour out the liquid they have been canned in, rinse in a colander under cold water and they are ready to use.
Place the beans in a food processor and pulse for 30 seconds.
Peel the garlic cloves and dump in with the beans.
Add the salt, pepper and any other spices you want to add, add some of the lemon juice and some of the oil and pulse or process until a nice paste has formed.
Taste and add the rest of the lemon juice and the oil and process for a few more seconds.
Taste again and adjust any seasoning to your personal liking.


Plate nicely and pair with some pita, flat bread or any regular bread or crackers.
It tastes awesome !

Raspberry Curd


When I found a larger- than- normal size box of raspberries at Reasor's I instantly thought about raspberry curd and how tangy and wonderful it will taste.
I have to admit I was hopeful and maybe I was expecting too much, After all, it is just curd, not raspberry jam- what results from pairing fruit with eggs, sugar and butter.
It is good, but not AS good as lemon or lime curd.
It is suitable for cake fillings or spreading on scones or donuts, but it is not as WONDERFUL as I was hoping it would be.
I have the recipe, if anybody wants it.
:)

Thursday, August 27, 2009

Linzer Cookies


After cutting the smaller star in the center of the cookie, you will need to use your cake spatula as it is the perfect tool for lifting the very sensitive piece of dough.
Do not remove the piece of dough from the center until you have lifted it from your work surface.
Use a toothpick to pinch and lift the dough from the center of the cookie.


I really wanted to make these for a while, and looked lately for a linzer cookie cutter -but couldn't really find one.
Sad.
But wait ! You know those cute little fondant cutters which come in many shapes ?
That's what I used. I bought a set of those made by Wilton (at Michael's) star shaped with 3 pieces. They worked perfectly !
And because I wasn't happy with any recipe for linzer cookies, I decided to make my own.
It's to die for. And remember that if you like them soft, eat them a while after putting them together - the next day works best.
But on the other hand, if you like them crisp - eat them right after putting them together with the filling.

Ingredients:
1 stick butter (8 TBSP or 113 gr)
1/2 teaspoon baking powder
250 gr flour (2 cups)
1/4 teaspoon salt
1/4 teaspoon cinnamon
1 scant teaspoon citrus zest
1/8 teaspoon almond extract
1/8 teaspoon vanilla extract
1/2 cup sugar
60 gr walnuts, toasted, ground
raspberry jam or any other jam you like

Directions:
Mix all the above ingredients to form a soft dough - but start with the butter and sugar and after you have fully incorporated the sugar into the butter, work your way with the other ingredients.
Chill the dough between 10 to 30 minutes, then divide in 2 or 3 pieces and work with one piece at a time, keeping the rest of the dough in the fridge, covered.
Cut pieces using your linzer cookie cutter or your biscuits or cookies cutter.
Work by cutting pairs of 2 at a time, and make a small cut in the middle of the second one with a star shaped cutter.
Preheat the oven to 350 F and bake the cookies on a parchment paper lined baking sheet for exactly 12 minutes.
Remove them and let them cool on a plate or cooling rack.
If you like, you can dust the cookie that will be the tops with powder sugar.
When cool put 1/2 teaspoon jam on the base and top with the cut pair cookie.
If eaten right away they will be crisp.
If eaten the next day, they will be soft.
I prefer them the next day.

Blueberry Pancakes

Here are my mini blueberry pancakes.


The blueberry pancakes !
Perfect any time of the day - not just for breakfast.
If you never made any yourself from scratch - you should try it now.
Alton Brown has this awesome recipe you really need to try.
You drop the fruit onto the pancakes after you have poured the batter on your grill or in your skillet.

Tuesday, August 25, 2009

Crispiest Hash Browns - Ever


This is the tool that does the wonder.

Finally.
The mystery to making crisp hash browns has been uncovered.
Here is where I found the brilliant idea.

Oh - and I also dropped the potatoes into a cold water bath after shredding and until I pressed them using the potato ricer.

Monday, August 24, 2009

Roasted Pork Loin and Potato Quarters

Click on the pictures to see them in real size.


As I was experimenting in the kitchen, I came up with this beautiful result !
Just clean everything, cut, season, roast in the oven and indulge !

Ingredients:
2 pieces of boneless pork loin or any other cut of pork (although I think beef, turkey, lamb or chicken would do just as good)
4-5 small potatoes cut in 3 or 4 pieces (you can always leave the skin in - I used red potatoes)
hamburger seasoning
kosher salt
pepper
thyme
dry parsley flakes
dry basil
3-4 TBSP oil

Directions:
Preheat the oven to 425 F.
Place everything in a large bowl and toss together so that everything is covered with oil and seasonings.
Next put arrange everything nicely in a baking pan and put it in the oven.
Let cook for exactly 55 minutes.
The potatoes will begin to turn a beautiful golden-brown and the meat will be perfectly roasted.
Yum !

Sunday, August 23, 2009

I got this from Judith !


I got this nice message from Judith wishing me a wonderful day.
As she told me, I need to send it forward to 3 or more people.
Thank you so much Judith - you're so nice !

So I am sending this to:
Bucataria-Paradis
Deborah
Judith
Laura
Lissa
Mihaela
Narnia
Nina
Oana
Have a wonderful day !

Grissini or Cheese Sticks


Those are from a batch of grissini with shredded mozzarella.

They taste so good and they use one of my mother's recipe, only adapted to the cheese I can find here where I live now.
Good for entertaining too !

Ingredients:
600 gr flour
500 gr butter or baking margarine (don't use spread !)
1 pack of cream cheese (8 oz)
250 gr cottage cheese
2 teaspoons baking powder
dash of salt
dash of pepper
1 beaten egg for glazing at the end
poppy/sesame seeds for topping
****you could use mozzarella instead, but you also need to add 1 egg yolk if so and make sure you grind the cheese a bit before adding it to the rest of the ingredients.****

Directions:
Combine all the ingredients and let chill in the fridge for 30 minutes.
Preheat the oven to 350 Fand line 2 baking sheets with parchment paper.
Divide in 2 or 3 pieces and while working with one piece at a time, let the rest of the dough sit in the fridge.
Spread the dough on a floured surface to a 1/8 inch thickness.


They will double or even triple while baking.
Using a pizza cutter or pastry cutter, cut the sticks to 1/2 inch width.
Glaze them with the beaten egg and top them with poppy/sesame seeds.
Bake for approx 20 minutes.
Keep a close eye on them.

Hasselback or Accordion Potatoes


So easy and so full of flavor!
I served mine with tomato salad with onion.
So good !
I made 2 at the beginning to test out a theory of mine and I found out it is not indicated to stuff your potatoes with cheese and bake them uncovered.
The cheese will obviously met and burn.
Sad.

Ingredients:
2 medium potatoes per person
2-3 cloves of garlic, sliced
2-4 TBSP oil (olive oil if you have)
2 TBSP butter
kosher salt
pepper
sausage if you have or like (cooked or uncooked)

Directions:
Preheat the oven to 425 F.
Scrub your potatoes well and if the are not new potatoes, you can peel them.
Place the potatoes flat side down on your cutting board.
Start at one end of the potato and cut 1/8 - 1/4 inch thick slices, almost all the way through.
Place the potatoes in a baking dish or put them in a piece of aluminum foil.


Insert garlic, meat, butter in between the slices.
Drizzle oil and sprinkle seasonings.
If you are using aluminum now is the time to tightly wrap them all the way and place them in a baking tray.
Bake them for 40-60 minutes or until they turn crispy and they are soft on the inside and cooked all the way through.
If, however, used aluminum foil wrap, I suggest you bake them without the foil for the last 20 minutes.
Otherwise they just tend to steam a lot in the foil and may be too soft for your taste.
2 potatoes for 1 person and with a small bowl of salad on the side is plenty of food for dinner, even if you may not think so.

The cheese experiment.

The result of the cheese experiment.

Chicken Piccata


I made Chicken Piccata using Ina's recipe and I have got to tell you that it was one of the best breaded dishes I have ever had.
I never made Chicken Piccata before, nor did I ever eat breaded chicken (ok maybe if you count chicken nuggets at KFC - I had).
But I like it !
If you do it properly, the breading process (the covering in bread crumbs - and remember I had to make my own) keeps the meat moist and juicy and the crunch on the outside only adds to the deliciousness !

Garlic Marinated Pork and Chicken Skewers


The grilled meat will always be juicier and more flavorful if marinated and the more intense the flavor of the marinade, then greater the final dish.
I made the marinade and set it aside, cut the meat in bite-size pieces and prepared the skewers and the grill.
You do not really need a recipe for this, but just as general guidelines I have posted a recipe for what I did.
They took no time to make !

Ingredients:
For the Skewers:
a few mushrooms, cut into rather large pieces
a few slices of carrot
1/2 bell pepper cut into pieces about the size of the carrot slices
1/2 onion cut into pieces (cut the onion in half vertically then in half horizontally)
pork and chicken thighs or breast, 2 handfuls, cut into bite-size pieces

For the Marinade:
6 cloves of garlic
1/2 onion
1/4 cup oil
1 teaspoon kosher salt
1/2 teaspoon ground pepper
1 scant TBSP mustard
oregano
basil
a few nuts if you have
persley
2-4 TBSP lemon juice or 1 TBSP vinegar

Directions:
I use bamboo skewers and for the grill I use the George Foreman Grill.
Combine all the marinade ingredients in a food processor, blender or in a small chopper.
Pour the marinade in a ziplock bag and add the meat to it.
Shake well to combine and let sit in the fridge at least one hour if you do not have more time.
When it is time for grilling, pour the bag contents on a large plate and start assembling the skewers.
Cook on high for 2 minutes on every side.
They pair well with anything !

Perfect Hard Boiled Eggs Every Time


Take the eggs out of the fridge and place them in a medium size saucepan.
Fill the saucepan with water just so that the eggs are covered with 1 inch of water.
Bring to a boil on medium high heat.
Turn off the heat, cover the pan and let the eggs sit there for 10-12 minutes.
Remove the eggs from water and rinse under cold water until cool or manageable so you can peel them.
I actually let them sit for approx. 1 minute in cold water and that is a good alternative to just rinsing them.
The eggs will be perfect !

Nicoise Salad Platter with Pork and Chicken Skewers


Nicoise salad is traditionally made with tuna, but really I did not want to have tuna in it and I opted for pork and chicken skewers that complemented the rest of the salad's ingredients.
I used Ina Garten's RECIPE for Roasted Salmon Nicoise Platter, but did not use arugula, potatoes or salmon.
I would say it is an easy, fast and refreshing salad !
And it looks elegant too !

Friday, August 21, 2009

Homemade Bread Crumbs


Umm...you may wonder why in the world would I do my own.
I have a perfectly reasonable answer for that : because very time I am at the store and I look for bread crumbs there are either none or what they have are seasoned bread crumbs.
:(
My fav ones are Panko Bread Crumbs, slightly elongated and yummy, but I really never saw those anywhere, just on TV.
So since I needed some crumbs for my chicken I had to make my own.
And boy was I happy about freezing slice bread as I could now turn the slices into fresh crumbs !
Fearing the crumbs would go stale, I put the rest in a ziplock bag and put them in the freezer for later use.

Ingredients:
a few slices of bread either fresh or frozen (please do not use stale as the crumbs will taste stale)

Directions:
Preheat the oven to 300 F and place the bread slices on a baking sheet.
Bake the bread for 15-25 minutes, turning it on the other side once.
You do not want to brown your bread, you just want to make it dry as you will need it crispy for making your crumbs.
As I plan on using it for breaded fried chicken, the crumbs will brown while frying along with the chicken, in my skillet.
Remove from oven, cool, place in a food processor and pulse until the desired size or coarseness is achieved.
If you do not have a food processor simply put the bread slices in a plastic bag and using your pastry rolling pin or a glass bottle press until you get crumbs.
Easy !

Roasted Onion


Who does not like onion ?
Sometimes it can be pungent or mild, but regardless of how strong (yellow onion, red/violet onion) or mild (challots, vidalia, white onion, green onion) it is, onion it a very important ingredient in anyone's kitchen.
How many ways can you prepare the onion ?
You can choose fried onion rings, fried blooming onion, French onion soup, caramelized onions for toppings, or you can roast your onion after carefully marinating it.
I tell you, there is a miracle happening to your food every time you marinate something.
And don't take my word for it, get to work and start marinating something right now !

I really wanted to use red onions for this side dish, but looked in the fridge and there was none, so I replaced it with white onion.
And really, any onion you have on hand will make a beautiful roasted side dish for your dinner tonight.

Ingredients:
1 large onion or 2 small ones, cut into wedges
2 -4 TBSP lime or lemon juice or if you do not have lemons you can substitute it by 2 scant TBSP white vinegar
2 teaspoons mustard, any kind you have
2 teaspoons finely minced garlic (2-4 cloves)
some thyme
some basil
some oregano
some parsley, all these dry or if fresh finely chopped
3/4 teaspoon kosher salt
some pepper
1/3 - 1/4 cup oil

Directions:
Combine all the ingredients in a bowl, then pour the marinade into a large ziplock bag and add the onions to it.
I let mine sit approx 5 hours, but you can let it set for less time, at least 30 minutes.
Preheat the oven to 400 F.
Place the onions on a baking sheet and bake for 30-45 minutes until they turn tender and a bit brown, stirring once half through the cooking process.
You may have some marinade left after you have transferred the onion to the baking sheet and you can either discard it or you can reserve it to drizzle over the baked onion.
I like to eat it when hot, but it is still good at room temperature too.
Enjoy !

Beautiful Pink Roses


My dear husbands always brings me the most beautiful roses.
He usually buys red, but this time he got me dark pink.
Love them !
Thanks Jeff !

Best Pecan Pie I made so far !


I tasted the best pecan pie so far made by someone else other than myself at my Mother and Father In Law, as my Father in Law makes this pie to die for !
So tasting that awesome pie, I really wanted to make my own variation and see what I can come up with.
I made it once, loved it and now I made it a second time and really I think I'm improving !
Yey for me !
It doesn't necessarily take long to make and it does not need anything exotic.
Also, it uses an unbaked crust and it needs to be cooked on the lower third part of your oven, covered for the first 35 minutes with aluminum foil.
Let's get cookin' !


Ingredients:

200 gr brown sugar
2/3 cup light corn syrup
4 TBSP unsalted butter
1/2 teaspoon Vanilla extract
3 eggs
1/4 cup cream
1/8 teaspoon salt
Pecans, 250 gr OR 150 gr pecans and 100 gr walnuts
1 teaspoon orange or lemon zest
one 9 inch pie crust from Jiffy Pie Crust Mix

Directions:
In a saucepan combine the sugar, corn syrup, vanilla and butter to a boil, boil 2 minutes and then cool.
Make the pie dough, line it in the pie pan and place in the fridge to chill.
Roast the pecans at 350 F for 8-10 minutes, cool and chop roughly (I even ground like a handful of nuts).
In a medium-large bowl mix the eggs, cream, salt, pecans (and any other nuts) and lemon zest.
When everything is cool, combine the brown sugar mixture with the egg mixture and the chopped nuts and then pour it in the chilled pie crust.
Cover with aluminum foil as you do not want it to burn and place on the lower third of your 350 F preheated oven.
Bake for 35 minutes covered then remove the aluminum and bake for 18-23 more minutes.
Keep an eye on it.
Pairs nicely with fresh whipped cream.
The taste is decadent and you will thank me for suggesting it.

Wednesday, August 19, 2009

How to Plate Like a Pro


HERE is where how I actually found how to do this - plate like a pro !
Take a peek and learn from the professionals !

Clock it: The conventional "smiley face" (starch at ten o'clock, meat at two o'clock, and vegetables at six o'clock) is always a safe bet.

Focus, focus: For more drama, "find the focal point" of the meal (usually the protein) and elevate it by placing it on or leaning it up against the starch.

Get saucy: Spoon sauce under the meat rather than on top. This allows the meat's crust to stay crisp while also offering a contrasting circular shape beneath.

How to Store Citrust Fruit Zest


You may end up with some left over zest from your cooking and you may not be sure whether to throw it away or freeze it or you may even be tempted to add extra to your dishes just because you have plenty of it.
I suggest you don't over empower your cakes or fillings or sauces with the zest.
What I do with the zest is to save it in the fridge.
Here is what you need to do :

Ingredients:
citrus fruits of your choice, with nice shiny and healthy looking skin
a few TBSP of the fruits' juice, freshly squeezed
1/2 teaspoon sugar
1 small plastic container with tightly fitting lid

Directions:
Wash your fruits with hot water, wipe them dry and zest them over a cutting board or a large plate.
Keep in mind that lemons, limes, oranges etc are easier to zest when cold and easier to juice when warm.
OK, so after zesting them you need to put each one down on your kitchen counter and with your palm over it rotate back and forth and press.
This is going to be equal to squeezing the fruit in your hand.
At this point. let the zested fruit lay there for at least 10 minutes and attend to your zest.
Open the plastic container (or you could simply use a plastic ziplock bag), put the zest in and add the sugar and 1 to 2 TBSP juice from a half of a lemon you will need to juice just for this.
Now you may wonder why you need to do that.
I have tried it with just sugar too, but the color fades s the days pass, and I have found that adding the juice not only keeps the zest moist, but also keeps the color bright and cheerful.
Let's say you will not have any juice and only sugar.
What will happen then ?
Well, then the sugar will pull out some of the liquid of the zest itself and this will help prevent the zest turning dry.
When you're done adding the zest, juice and sugar, close the plastic container or plastic bag and shake to combine.
Store in the fridge and it will keep for a long time, if of course, you do not need it for any exquisite pie ! Or cake !
(What you see in these pictures is zest that has sat in the fridge for 3 days and I think it looks great.)