Saturday, October 31, 2009

Spicy Beans


Even to this day I am not Exactly or Really sure what chili is supposed to be.
They have chili con carne and chili with beans out there....even chili with carne (meat) AND beans....so.....I came to the conclusion that what people call chili has to be a one pot meal that has to have ground meat (preferably ground beef) spiced up with cumin which gives it that specific flavor and smell...and maybe beans, but definitely lots of tomato sauce.
If any of you out there can shed some light on this matter for me, please leave me a comment so I lose some of the confusion.
Your input is greatly appreciated !


So for now I will just call this meal "spicy beans" - which were really good, nonetheless.

Ingredients:
1 cup Navy beans or other beans variety


1 carrot, diced
1/2 red bell pepper, diced
2 red tomatoes, diced
1 onion, diced


1/2 teaspoon salt
1/4 to 1/2 teaspoon pepper
1/2 to 1 teaspoon cumin
1/8 to 1/4 teaspoon cayenne pepper


some pepper flakes if you have
one 14 oz can of chili style diced tomatoes


3 to 5 TBSP oil
parsley or cilantro, chopped
some cheese, for garnish


Directions:
Begin with the beans and cook them like HERE.
Then proceed with the veggies - all the diced veggies along with the spices and condiments will have to be sauteed for approx. 6 to 8 minutes on medium-high heat so they can soften, in a medium sized pot or saucepan.
Add the can of tomatoes, cooking them until they reach a boiling point, then add the beans and cook until they reach the boiling point again, simmering for 5 to 10 minutes.
It should not take more that another 10 to 15 minutes in total.


Before you plate it, taste and make sure it meets your taste requirements.
Stir the parsley or cilantro at the end and garnish with the cheese in your plate at the end.
I think they are delicious, hearty and good for you too.


Enjoy !

Thursday, October 29, 2009

You Want Pies With That ? - Flower Apple Tart


I have discovered a few interesting websites that focus on certain themes....most of them separated by days (sugar high Fridays comes to my mind now, as an example)....but this one I decided to subscribe to is "You want pies with that ?" .
They have a special section called Everything you need to know - for those of you who are not familiar with the challenge and would like to read more about it.


Needless to say, all the members there are so talented and dedicated and I feel like a novice compared to them.
They have a theme chosen by a previous winner that is in place and lasts for a whole month, and to enter in the competition you only need to post about your chosen pie or tart that complies with the theme and then email a picture of the recipe along with a permanent link to your blog where you have posted it, with the recipe.
For October they have chosen "Masquerade Pie - what could be more perfect for the month of Halloween!
"Masquerade Pie" - Make a pie that has a secret.

You can conceal your pie's secret identity (with a robe of dark
chocolate, maybe?) or disguise your pie as one thing when it's really
something else (like a mock apple pie deceptively made with Ritz
crackers instead of apples). You can use a mysterious, unusual or
surprising ingredient in your pie or if you're more inclined to step
out from behind the mask, you can reveal a secret recipe or technique.
"

This is their description on the website.
So to comply with the given directions and requests, I have chosen to make a FLOWER APPLE TART....which has a secret.....drum roll....ta da ra ra..... Marzipan !
It's a recipe I came up with, some days ago when I was in my quest for the perfect French Apple Tart. Boy was it good !
I hope at least some of you - my dear readers - will try it so I can get some feedback on what you think of it.

Ingredients:
2 Granny Smith apples
1 pie crust (bought or homemade)


1/2 box marzipan paste


2 TBSP brown sugar
3 TBSP powder sugar or plain white sugar
2 teaspoons cinnamon
1/2 teaspoon orange zest
2 or 3 TBSP butter, cut into very thing slices
orange reduction or apricot jam

Directions:
Thaw the frozen pie crust and place it in a 9 inch pie pan, with the edges tucked in nicely.


Choose 2 nice apples, wash, peel, cut in half and core the them (all I had left apple-wise were these 3 apples, so I got to eat the other one raw !).


Then cut each half into 1/8 inch thick slices and have ready to top the tart with.
In a food processor mix the cinnamon, brown sugar, zest and and marzipan until well combined.


Pour the mixture in the pie crust


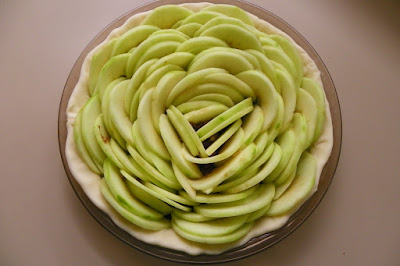
and top with the apple slices, beginning at the edges.


Arrange them nicely so it looks like a flower at the end.

This is how your tart / pie will look like after you have fittied the first apple slices in.
Not to worry, the other slices will fit in just right !


Just tuck them in nicely as if they were a rose's petals.

When you are done, top with some powder sugar or white sugar. If you wish, you can also add some cinnamon to the sugar, although it does not really do much for the tart.


Then top with the butter that you have cut into thin slices or small pieces.


Bake at 425 F for 25 to 40 minutes, depending on how fast your apples will look baked.

Some of the apple edges will begin to brown.

Heat up the orange reduction or the apricot jam a bit and brush it over the apple tart.

Let cool at least 10 minutes before cutting.


Enjoy !

Braided Franks

See how flaky and wonderful they are ?


There is a pastry shop in the town I used to live in that has these awesome pastries (Patiseria Select - Piata Unirii) that are just to die for.
Being a little hard for me to just go there and buy a few, then come back here, I said to myself that I really must try a personal replica of these, in my very own kitchen.
Sure enough, the result met my high expectations and really it wasn't even hard to do !
I thought that boiling the hot dog links for 2 minutes would puff them up a bit so they would not dry while baking, but then I changed my mind right before I began working on them.


They seemed juicy in the package and I thought to myself I can take my chances with this - at least this time.

Ingredients:
4 franks (hot dog links)
1 puff pastry sheet


Directions:
Thaw the puff pastry sheet at room temperature for 25 to 40 minutes, depending on how warm and cozy your house / kitchen is.
When ready, lightly flour your work surface, spread the dough, cut in 4 and start working with one frank at a time.


Cut small margin pieces of dough on each side, then place the frank in the middle and start making the braid.

I thought the dough braid should be moistened with a little water before placing the dough pieces on top of the other, but as I was doing it I realized that there is no need (look at the pictures here of before and after)....


as the dough is soft enough to bind well and also, the braid is strong so even when puffed up, there is no way this braid would open.
I was right !


When done, place all the braided franks on a parchment lined baking sheet.

Make sure you tuck the ends well in.


Bake them at 400 for 20 to 30 minutes, until golden and delicious !