Thursday, February 18, 2010

The Best Frozen Pizza. Ever.


Just because it is placed on the freezer isle of your supermarket, that does not mean that the frozen pizza should receive disrespect, on the contrary - I believe I have found the best one out there and you need to go try it.


Well, IF you can find it .... depending on where you live.


Watch and enjoy...


Some of the pictures have been taken with the DSLR Nikon D90 Camera and a close-up lens ...the macro lens, while the rest of the pictures have been taken with the Kodak Camera.


Click on the pictures so you can see the finer details you would otherwise miss by not clicking .


Have you ever had this pizza before ?
And now that you cannot wait to try it, go check their website HERE.

Monday, February 15, 2010

Swedish Meatballs


I am okay, for those of you who are/were actively following my blog and it is not that I might have stopped cooking or something similar, I have just been and actually still am very busy.
With life in general.
I am in Washington DC with some business right now and cannot really sleep although I really should, so I thought it would be nice if I would catch up on some blogging.


I will be showcasing the famous Swedish meatballs which have always sounded wonderful and all the pictures I have seen them in looked appetizing, so naturally, I had to try them.
What sets them apart is the buttery onion that goes into the composition and then the combination of pork and beef and all the spices that go in.
All in all, just a wonderful meal that you really need to try.
Meatballs can be made in a million ways, but there are really different and I wish I knew what gave them their name.


I have used Alton Brown's (my cooking guru...lol) recipe which can be found HERE, with the exception that I combined pork with beef.
I have also only cooked half of the recipe and served my Swedish meatballs on a bed of spaghetti.
If you do so too, do not forget to add a touch of finely chopped parsley, you know, for a burst of color and freshness.

After you pretty much have laid all your measured ingredients around and you have chosen the small non-stick skillet,


you can start chopping the onion and sautee it in butter,


until it softens.


This way, they butter will be mostly infused into the onion.


While the onion is cooking, make sure you have the bread soaking...


and if you are like me, and like whole grain better, just go ahead and used that instead of white bread.
In the meantime, don't hesitate to indulge yourself ....grapes it is this time !


When the onion is ready, let it cool down for a few minutes, then combine with the rest of the ingredients...

and mix well with your hand or a fork.
I used my hand, but wore a plastic/rubber glove.
At this point it might look like this


and I would suggest you let it sit for at least 10 minutes so that the flavors can mingle.
When shaping the meatballs, use either a spoon, teaspoon or an icecream scoop to help you in the process.

And fry them, not necessarily in butter.
If you do decide to use butter and it is not clarified, be sure not to let it burn or it might spoil the taste of your wonderful Swedish meatballs.
Enjoy !
Any questions or comments?
Feel free to share your thoughts !

*** I almost forgot: I did make the sauce to go with it, but because I am not crazy for it, I do not recommend it. However, you are free to try and it as you might like it. I'm just picky, that's all.

Saturday, February 6, 2010

Chopped Bacon Green Beans


Remember the recipe where I was wrapping the long green beans in bacon and baking them in the oven ?....well, this recipe is somewhat the same, but very different at the same time.
You will need very few ingredients for this recipe and you will see you can even do it quite fast too.
The kick and the plus of this recipe comes both from the steak and from the bacon that flavors the green beans so well.
I prefer cooking the beans at home, either fresh or frozen, but you can go ahead and use any canned beans you might like, even though they will not be the same.
I urge you to make this....it's pretty amazing.

Ingredients:
2 pieces of beef steak


2 handfuls of green beans


3 slices of bacon, chopped (or more, if you feel like it)


1/3 teaspoon kosher salt (for the green beans)
1 dash of pepper (for the green beans)
5 cups water
2 teaspoons oil
1/2 teaspoon salt (for the steak)
1/3 teaspoon coarse ground black pepper (for the steak)
2 TBSP butter (for the steak)

Directions:
First of all, gather all your ingredients and have them handy, making sure you have everything measured and ready to use.
Preheat the oven to 400 F and place a small cast iron skillet on your stove, on medium-high heat and let it warm up for 2 minutes.
Place the meat on a small plate, pour 1 teaspoon of oil on each and rub it well on all sides, then season with the salt and pepper.


Now place the meat in the heated skillet and cook for 2 minutes on each side.
When it has finished cooking on the stove, top each piece with 1 TBSP butter and place it in the preheated oven.


Let cook for 10 minutes.
Once the time has passed, remove from the oven and cover with aluminum foil and let it rest for 5 to 10 more minutes.


You will have all the other ingredients of your dinner ready by that point.
Cut the bacon slices into tiny bits (mine were 1/4 inch wide and almost 1 inch long)


and place them in a medium size saucepan, on medium-high heat.
Make sure you stir quite often.
In 5 or so minutes the bacon should look from this stage


to this stage.


Keep in mind that you want it cooked, slightly crispy, but not charred.
In another medium size saucepan, bring the 5 cups of water to a boil, with a dash of salt added.
When the water begins to boil, drop the green beans in


(at this point it does not matter if you are using fresh or frozen green beans, as the cooking time will be the same) and bring again to a boil,


then let them cook for exactly 4 minutes from that point.
Have a large bowl with cold water and possibly some ice in it too, topped with a colander ready for the beans.


When the beans are boiled, strain them and then place the colander directly in the cold water.
That will shock them and stop the cooking process and also will maintain that beautiful green color.
Now that you have the beans ready, place them over the bacon and considering that the steak is waiting for you, cook the green beans and the bacon for exactly 2 minutes, basically for the flavor to mingle together.


Do not forget to add some kosher salt too.


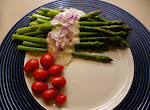
At this point you can go ahead and indulge !
Enjoy !

Tuesday, February 2, 2010

Steam your Beans !!


Of course you can always just pick up a can of beans off the supermarket shelf whenever you need them, but you can always just as well let them soak and boil them yourself.
I just prefer to cook the beans at home as opposed to buying them in a can simply because I like them fresh, I can skip the Aluminum (may it be even scant) that gets transferred from the can itself into the canned product (which by the way, I have read that it can produce Aluminum intoxication over time) and then thirdly just because I can choose the exact amount I wish to prepare and I am not stuck with too much or have to deal with insufficient beans.
Those being said, because I have steamed beans for the first time, I thought I would share.
They turned out great !
Even better than boiling them.
And it's easy to do it too....wash, rinse, place in the steamer bowl (it is called a rice bowl), cover with water, then start the steaming !!

Ingredients:
1 cup beans
1 cup water for covering them
7 cups water for the steamer

Directions:
Pick your beans, place them in a bowl


and wash them in there.


Then rinse and let sit in water


until you pull out your steamer from the kitchen cabinet and get it ready.


Fill the steamer lower compartment with the 7 cups of water or just until it hits the "MAXIMUM" mark,


place the basket with the holes on top and place the rice bowl or compact plastic bowl in it....


add the beans, cover with the 1 cup water, place the lid on top and start your steamer.
Make sure it is set for 65 minutes.


Look at that steam !!


At the 40 minutes mark check on your beans and go from there, although in my case there was no need to add any more water in any of the 2 compartments.
When ready, just use as any other canned beans.
Enjoy !