Monday, September 7, 2009

Caramelized Onion


If there is a small group of so called perfect toppings, then I think caramelized onions is among the few in that group.
Even though you can choose just about any pan, saucepan or skillet to cook these onions, I personally prefer my cast iron dutch oven.
It takes a little while for the onion to cook, but it is all worth it !
Ok, so you cook them, and then you think.....now what do I do with my beautifully caramelized and very fragrant onions?
You can make mini pizzas, a regular pizza, a tart, a quiche, an omelette, top your mashed potatoes, add them to your hamburger, hot dog, make onion soup and the list could just go on and on....

Ingredients:
3 TBSP oil (or olive oil if you have)
3 large onions, sliced ( 1/4-1/8 inch thick )
1 teaspoon kosher salt
1/2 to 1 teaspoon pepper
1/2 teaspoon dried basil
1/2 teaspoon Italian seasonings
2 scant teaspoons sugar

Directions:
Place the sliced onions and oil in your pan or skillet of choice and add the seasonings.


Toss to combine and let them cook on low heat , stirring only occasionally for approx. 1 and a half hours.
Here after 10 minutes.

Here at 30 minutes.

Here at the end.

If you then decide to go ahead and make the onion soup, you can try this recipe below.

Ingredients:
the caramelized onions you just cooked
4 teaspoons cornstarch dissolved in 1 cup cold water
1/2 cup sherry wine
3 bay leaves
thyme
basil
tarragon
salt to taste
oregano
3 more cups of water (you will have 4 in total as you have one cup in which you dissolved the cornstarch)
*** toppings for the soup: toasted bread and cheese of your choice (I toast my bread in the toaster oven and melt the cheese in the microwave for 45 seconds)


Directions:
In a heavy pan bring all the ingredients to a boil, then reduce the heat and simmer on low for 15-20 minutes.
Taste every now and then and adjust the seasonings and make sure you remove the bay leaves.
Enjoy !

Cinnamon Granola


I made another batch of granola, this time with 2 teaspoons of good cinnamon added.
So good.
I keep it on the kitchen counter in one of those ceramic kitchen essentials holders.
In about a week or so the batch you see is gone.
This time I used as follows:
4 cups old fashion oats
2 cups sweet coconut flakes
1/2 cup cranberries
2 cups slivered almonds
1/2 cups almond slices
60 ml oil
1/2 cup honey
2 teaspoons cinnamon
Tossed to combine in a big bowl and then spread it evenly in this baking sheet.
I baked it at 350 F for approx 25 minutes, stirring every 5 minutes.

French Toast


Really wanted to make some french toast, but did not have the brioche - so I made that.
And the next step was to soak the brioche slices in the vanilla-egg mixture.
It tastes so good, you will ask yourself why did you not make it earlier !

Ingredients:
2 eggs, beaten
1/2 cup heavy cream (half & half or milk work well too)
1 TBSP sugar
1 teaspoon good vanilla
1 teaspoon orange liqueur if you have
4 slices of brioche
2 TBSP butter
***ground toasted nuts and strawberry jam if you like, for topping

Directions:
Even though there are so many ways to make this and soak it on both sides or on one side or overnight or you name it how - I believe that the way I did it works well. Really well.
Heat your skillet or griddle on medium for approx. 5 minutes and when hot, drop 1 TBSP butter to melt.
Place the eggs, cream, sugar, vanilla and the liqueur (if you are using) in a medium-large bowl and beat with a whisk for 1/2 minute.
Soak 2 of the brioche slices in the mixture and let sit for 10-15 seconds on each side.
Cook for 3 minutes or so on each side, on medium heat.
Repeat with the remaining butter and soaked slices.
Top it with nuts and jam or pancake syrup and serve warm.


It's so yummy !

Sunday, September 6, 2009

Orange Juice Reduction (O.J. Thick Syrup)


Since I am not particularly fond of store bought sauces and syrups- not because I don't like the taste, but because I cannot control what goes in them- I made my own version of orange juice reduction, which is a honey-like orange syrup.
I do not think you can find a recipe for it out there, as I could not find one myself, but you can always give it your best shot - or - try mine instead.
I wanted to have this in the fridge, handy for drizzling on cakes, cookies and other good stuff.

Ingredients:
12 oz orange concentrate (1 can frozen concentrate which has 355 ml)
2 heaping TBSP white sugar
2 TBSP honey
4-7 TBSP powder sugar (confectioner's sugar, cause it has a tiny amount of cornstarch in it)
***love and patience go in as well

Directions:
Choose a medium size saucepan.
If you have the frozen concentrate fresh out of the freezer, you will need to keep it (the can) in warm or hot water for a couple of minutes to loosen up the frosty edges - so when you open the can the block of frozen concentrate comes right out.
Ok, so place the orange juice in the saucepan along with he white sugar, honey and some of the powder sugar.


Bring to a boil, stirring a bit and then when it hits the boiling point reduce the heat to medium-low and let simmer for 10 to 20 minutes.


Stir only every now and then and you will be able to tell it is ready when it achieves a slightly darker color, looks like honey and it has reduced in volume.


I got 1 cup of orange juice reduction (I poured it in a measuring cup to make sure and out of the 355 ml plus the sugar I got 230 ml at the end) and when it cooled down I poured it in a sauce dispenser.

You know, like the mustard or ketchup sometimes comes in.
Here it is drizzled over some hot oatmeal.

Saturday, September 5, 2009

Cheese Strudel

What comes to your mind when you hear "Cheese Strudel" ?


For some people it may seem like something rather scary as this pastry needs those paper thin layers, but it can also be fun if you decide to give it a try and let your fears aside. That is - if you have never baked this delicacy at home.
Imagine layers upon layers of phyllo dough with butter in between them and with layers of cheese nested by the phyllo pastry.
I will post a few pictures so you can see how I make it.
Trust me, the recipes out there are endless and I have mastered mine over time and made it so it does not dry out, but gives you a smooth velvety cheese pastry. Yum.
Even though I chose to use store bough phyllo dough, you can always make your own, at home.

Ingredients:
15 oz ricotta cheese which is 426 gr (or farmer's cheese if you can find it)
1/2 teaspoon orange zest (or lemon or lime)
2-4 TBSP sugar (add a little at a time and taste it as you add to make sure it suits your taste)
1 egg, beaten
pinch of salt (1/8 teaspoon)
1 teaspoon vanilla extract
1/8 to 1/4 almond extract (do not increase or it will become bitter)
1/2 to 3/4 cup milk
3-4 TBSP butter, melted
1/2 package phyllo dough
1 toothpick to poke holes for the pastry to vent

Directions:
Start by choosing your pan. Mine was a 6.5 X 8.5 inches.
Spray or butter your pan and set aside.
Preheat the oven to 375 F.
Make sure your frozen phyllo dough is thawed.
Choose a medium size bowl and place the ricotta cheese in it, along with the egg, zest, salt, vanilla and almond extracts and a bit of the sugar.


Use your whisk of an electric mixer to combine until a smooth paste forms.
Taste it and add more sugar if you wish.


One good thing to have in mind is to count all your phyllo sheets and decide how many layers of cheese you want.
Like for example my strudel had 4 layers of cheese, therefore I needed 5 layers of phyllo sheets.
So after you decide all that and you counted your phyllo sheets, divide the number of sheets by the number of layers of cheese plus 1. Cause you will need to have phyllo at the base as well as on top. Yes? Of course. Or you can choose to be a rebel and just eyeball it, like I do.
Now that you have figured all that out, take those layers and lay them at the bottom of the pan.
Spread some of the melted butter and using a wide spoon, make sure you coat the dough evenly. (You can very well use Pam spray or any other butter flavored spray instead of butter.)
Spread some cheese.
Repeat with the phyllo, butter, cheese and so on until all the layers are finished.
At some point you may run out of butter, in which case you need to use milk. It's ok, nobody will know. And I won't tell.
Now you need to take your toothpick and poke holes in random spots so the pastry can vent during the baking process.
After poking holes, pour the milk and place the pan in the oven (and be proud of yourself).
If it looks wet and you think you have a pool of milk in there, don't worry !
That's how it's supposed to be !

And let it bake for 30 to 40 minutes, until golden on top.


You did it !
Taste it while still warm and be sure to grab a glass of milk with it !

Napoli's Salad


There is an Italian restaurant that makes this yummy, yet simple (or is it simple, yet yummy ?) salad and it bears the restaurant's name : Napoli's.
Since I like it so much, I had to make a copycat of it. At home. Fresh. Hand tossed. Ok, maybe not quite hand tossed, but I was pretty close.
Wanna try it ?

Ingredients:
1/2 head of an iceberg lettuce head
1/2 cup shredded cheese (use mozzarella if possible)
1 hard boiled egg per person
2 sliced FRESH mushrooms per person
olives if you like them
dressing of your choice (I always use Ranch but Italian works well too)

Directions:
Cut the lettuce into bite size pieces and place in a large bowl.
Toss all ingredients to combine and serve in bowls or on plates.
It's crunchy and it bursts with flavor.
You'll love it.

Friday, September 4, 2009

Flatbread and a Quick Crunchy Pizza


I was just craving this flat bread and so....I went ahead and made a batch.
What's a girl to do ?
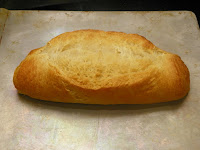
This is the type of bread you saw plated with the hummus and let me tell you it is so easy to make !
You have two options for baking it....either in the oven or in a skillet, preferably a cast iron one.
Apart from having to rise for about 45 minutes to 1 hour, the dough does not take long to bake.
Ready in minutes !

Ingredients:
325-350 gr flour
160 ml water or milk
5 gr instant yeast
1/2 teaspoon kosher salt
1 TBSP oil (use olive oil if you have)
1/2 teaspoon white sugar or 1 full teaspoon brown sugar
1 TBSP sour cream
1 teaspoon margarine/butter
1 TBSP heavy cream (or half and half)

Directions:
Combine all the wet ingredients and place the yeast on top, then stir to combine and let 10 minutes aside to soften.
Mix the dry ingredients and add them to the wet ones, stirring at first and kneading towards the end, to get a soft, pliable dough.
I always use my bread machine, on the dough cycle, but you can also do it by hand in which case you need to knead at least 10 minutes - or you can use a food processor or a stand mixer.
You do need to make sure some gluten forms so that the dough is pliable.
Place in a bowl, cover and let rise in a warm place (75-85 F if possible) for close to 1 hour.
Punch down and divide in 8 equal pieces.
Form balls and flatten them out to form disks.
You really should use your palms, but you can by all means use the rolling pin.
At this point you need to preheat the oven to 450 F.
When the oven is heated, place the pieces of dough on a baking sheet and bake them for 5 to 10 minutes, but please watch them closely.
They should puff up nicely.
Right under your eyes. Mine did !
Now the other option is to use a heavy cast iron skillet or the skillet of your choice.
Heat the skillet well, place the dough disk in the skillet, cover if you have a tight fitting lid and cook for approx. 4 minutes on each side.
Ready !
Oh, and it freezes well (you can defrost it by heating it 15 seconds in your microwave, which also makes it soft) and also makes great pizzas.
I took a flat bread, topped with some homemade tomato sauce, tomatoes and cheese and bakes it at 500 F for 7 minutes.
Delicious !

Thursday, September 3, 2009

Blueberry Pie


Ah, the blueberries...I have plenty of memories when it comes to them...
Anyhow, the blueberries are said to have plenty of antioxidants, you know....the stuff that helps keep us young, so the more you eat of them, the better for you.
Although, if you ask me....you are only as young as you feel.
I have a lady neighbor here that buys frozen berries from a family (that's what I think she said) that picks the berries and freezes them and then travels throughout the country to sell them.
I think they use a freezer truck, just like the ice cream is being transported- and the wonderful thing about it is that the fruit does not comes in large clumps, but individual berries. Just as if fresh !
Anyway, she told me about it a few months ago and now that she bought a large quantity, she showed up at my door one day to give me some. Wow, I thought to myself....they have "blueberry pie" written all over the bag. Lol
So here is my pie. And a few pieces of advice.You know, now that I have the "blueberry pie" experience.
I was happy with it, especially since it was the first ever blueberry pie I have made in my life.

Ingredients:
750gr blueberries fresh or frozen
3/4 cup sugar
juice from 1 lemon or half a lime
1 scant TBSP of citrus zest
1/4 teaspoon cinnamon (don't go for more or it will overpower the blueberries)
***do not use nutmeg, please
10 teaspoons cornstarch
2 TBSP butter, cut into small pieces (you can leave it out if you wish)
dough for double 9 inch crust (pate brisee or pie crust mix like I used)

Directions:
Make the pie crust dough, divide it in 2 slightly uneven pieces.
The larger one will be the pie crust base and you need to line a pie pan with and then put it in the fridge.
Now the other half of the dough will be for the lattice on top.
For now, wrap it in plastic and put it in the fridge.
Grab a large bowl and place the blueberries in it along with the sugar, lime/lemon juice and zest, cinnamon and cornstarch and toss to combine and then toss again every now and then.


Let them sit for 15-25 minutes at room temperature.
When you have 5 to 10 minutes left of waiting for the fruit to sit, take the piece of dough out of the fridge, unwrap it and roll it out to make a 9 inch disk.
Grab your pastry cutter and cut equal strips as if making cheese sticks.
At this point you will need to turn on your oven to 400 F.
When the oven is heated to 400 F take out the pie pan from the fridge and pour the berries in it, with all the juices that have formed.
Now begin to lay the lattice.
Hopefully my pictures will help you with that aspect if you have never done it before.
If you wish, dot with the pieces of butter.


Cover with aluminum foil and bake for 55 minutes covered and 25-35 uncovered.
Let cool down at room temperature or in the fridge so it can set and harden and only then cut and indulge !
Have fun !


I got this from Narnia !


Before I started my digital culinary adventure I did not know about the virtual prizes offered among bloggers, but now I not only know what they are and see them more and more often, but I even got a couple.
This second one is from Narnia and I thank her very much !
And of course, I want to dedicate it to all my followers !

Wednesday, September 2, 2009

Mash Potato with Sausage Links and Roasted bell peppers


When you do not have too much time for dinner, you can always grab the frozen stuff and the pouch of mash potato mix.
A jar of roasted bell peppers helps any day !
Don't you just love the patch of color - the bright red?

How to make Greek Style Yogurt


No matter what your reasons may be (price, convenience etc) for wishing to make your own Greek Style Yogurt, HERE it is the best piece of advice I have found so far.
The website also teaches you how to make yogurt at home.
You can control how much of it to make and what kind of milk to use and that's awesome - you know ... less restrictions makes for a more enjoyable recipe.
Give it a try !

I miss the Quince...


I remember how my mom would make quince jam, jelly and I remember i loved to spread it on toast, with butter.
Now I don't know where I could get any from and that's really bad especially since I read a lot about this fruit HERE.
Oh well....
Anyone can help me find quinces here (in Oklahoma) ?

GUTUI in Romanian.

Kataifi.....sort of


Kataifi is a Turkish dessert made with shredded phyllo dough which resembles angel hair pasta and it is very similar in taste with baklava. Simple to make (at least from my point of view), it does however take a bit of imagination to make if you don't have all the ingredients on hand - especially if you're stubborn and refuse to accept there is no way in the world you are not making this. Today.
So this kataifi dessert is a phyllo nest filled and/or layered with a mixture of ground nuts and lemony-sweet syrup. Simple, yes?
I looked all over the place at the shops we have "near by", but nobody seems to be carrying kataifi dough or shredded phyllo dough, therefore I improvised.
I concocted a syrup, then boiled the crumbled angel hair pasta in the syrup, using the microwave.....placed some ground walnuts at the base of 2 ramekins and topped with the now thicker pasta shreds.
Let it sit in the fridge for approx. 1 hour, then plated it and poured some cream on top.
It tasted divine, but I m sure it will taste EVEN BETTER with the real kataifi dough.
I did not use a recipe per se as I was just trying out the dish to see what I get by doing this my way.
Roughly though- there were 2 cups water, 1/2 cup lime juice, 1/2 cup sugar, some honey, lemon zest, pinch cinnamon.

Tuesday, September 1, 2009

Pork Soup with Orzo

A ladle of hot soup. Anyone ?
Bring on your plates !

The veggies after being sauteed.

The meat with some water.

I was craving my original soup...with pork. And of course with my all time favorite past : ORZO. It does not take a lot of time to prepare and it keeps really well in the fridge - but you have got to remember the trick - under cook the pasta as it will soften ore sitting in the broth.
You will not need to run to the store to purchase chicken or vegatable or any other kind of stock/broth as I will teach you how to develop the full flavor of this soup only from its wholesome ingredients.
Trust me on this - I have made enough soup to know by now.
Ready ?

Ingredients:
1/3 cup dry orzo (uncooked)
4 slices of boneless pork loin (the more, the better)
1 carrot
1/2 parsnip
1 bell pepper, any color
2 tomatoes
1 onion, any kind you have
5 to 7 cups of cold water
1/2 teaspoon kosher salt
1/4 teaspoon ground pepper
5 TBSP oil (3 for the veggies and 2 for the meat)
1/2 teaspoon hamburger seasoning
1/2 teaspoon dried parsley
1/2 teaspoon dried basil
dash of Italian seasoning
***more or less seasoning should be used according to anyone's personal taste
***the size of the vegetables is really according to you liking (use medium or large) - but I always use medium size

Directions:
Put the meat on a cutting board and with a sharp knife cut it into dice-sized pieces or larger if you wish so.
Heat the 2 TBSP of oil in a soup pot or a medium size saucepan that will hold approx. 10 cups of water, and add the meat.
Cook on medium-high heat for 5 to 10 minutes, until it looks done.
Add 2 cups of the water and let simmer on low heat.
In the meantime, wash and chop the veggies and sautee them in the 3 TBSP of oil that you have left, in a large skillet then add the seasonings.
It should not take more that 5-10 minutes on medium high heat.
In fact, try to have the meat and the veggies cook at the same time.
When the 10 minutes have passed, add the veggies to the meat and almost all the water at once.
Bring to a boil and from the moment it starts to boil, reduce the heat to simmer on low and let it cook for 10 minutes.
Add the orzo and boil it for 4 to 6 minutes, but make sure you taste it and it should be al dente (if you cook it for too long or if it is cooked for 8 to 10 minutes, it will become mushy by the next day - however try the orzo before having a serving).
And you're done.
Taste every now and then and adjust the salt and pepper level to your liking.
The pasta will still cook a bit more after you turn the heat off.
Ad the end add 1-2 handfuls of chopped cilantro.
It gives this soup a great kick.
YUM.