Thursday, November 4, 2010

Oven Fries and Chicken Strips


If you like fries and chicken strips, then you will most certainly enjoy this meal.
Because frying isn't all that good for you, baking the ingredients of this meal is a much preferred alternative and you do not even need many ingredients to make this for dinner tonight.

Ingredients:
* for the fries:
2 medium potatoes per person or 1 large per person (I always cook meals for 2 people)
1/2 teaspoon kosher salt
1/4 teaspoon black ground pepper
1/8 teaspoon sage
1/8 or even 1/16 teaspoon chili pepper powder
3 TBSP oil
* for the chicken:
the chicken pieces (6 in my case)
1/16 to 1/8 teaspoon chili powder
1/4 teaspoon kosher salt
1/4 teaspoon ground pepper
3 TBSP oil
a few drops Worcestershire sauce
a few drops liquid smoke
2 TBSP lemon juice
3 TBSP wine , if you have any


Directions:
Combine the ingredients for the chicken


and let marinate for at least 1 hour


directly in the pan.
You can either let it sit in the fridge or on your kitchen counter.
While that is happening, line a baking pan with aluminum foil and spread the thinly sliced fries.


Sprinkle with the oil and all the seasonings,


then toss to coat evenly on all sides.
Preheat the oven at 425 F and bake both at the same time for about 30 to 40 min or until the potatoes are golden and the marinade liquid in the chicken pan has evaporated and thickened a bit, like in the picture below.


The fries will have to look like this:


They might or might not stick to the aluminum foil.
Plate and serve!


Monday, November 1, 2010

Parker House Rolls


I do not remember ever making these amazing rolls before, but I am happy I bought the Food Network magazine and tried Alex's recipe.

Ingredients

  • 1 1/4-ounce packet active dry yeast
  • 1/2 cup sugar
  • 7 1/2 to 8 cups all-purpose flour, plus more for dusting
  • 12 tablespoons (1 1/2 sticks) unsalted butter, melted and cooled, plus softened butter for brushing
  • 2 cups whole milk, at room temperature
  • 2 large eggs, at room temperature
  • 1 tablespoon kosher salt, plus more for sprinkling

Directions

Bloom the yeast.
Measure out 1/2 cup warm water and check the temperature: It should be between 110 degrees F and 120 degrees F (comfortable bathwater temperature).
Sprinkle the yeast into a large bowl, add the warm water and whisk in the sugar.
Let sit 1 minute (it should bubble and froth slightly), then gently stir in 1 cup flour.
Set aside near the stove while you prepare the dough.
Make the dough.
Mix the melted butter and milk in a mixer with the hook attachment on low speed.
Add the eggs and mix until blended.
Scrape in the yeast mixture and mix until incorporated.
Add 6 1/2 cups flour and 1 tablespoon salt; mix until the dough forms a ball, 2 to 3 minutes, adding up to 1/2 cup more flour if the dough is too wet and sticky.
Let it rise.
Brush a large bowl with softened butter.
Transfer the dough to the bowl, cover with a towel and let rise in a warm place, 2 hours to 2 hours, 30 minutes.
The dough should double in volume.
Shape the dough.
Preheat the oven to 375 degrees F and line a baking sheet with parchment paper.
Dust a clean flat surface with flour and turn the dough out onto it.
Flour your hands; gently press the dough into a 16-by-8-inch rectangle, about 1/2 to 3/4 inch thick (don't use a rolling pin).
Cut the dough.
With the short side in front of you, cut the dough in half lengthwise with a floured knife.
Or better yet you can use a pizza cutter like I did.
Then slice crosswise into 12 strips.
Shape the dough.
One at a time, fold each strip of dough unevenly in half so the top part slightly overlaps the bottom half, then tuck the overhang underneath.
Place the rolls seam-side down on the prepared baking sheet in 3 tightly packed rows.
(If making in advance, wrap the baking sheet tightly in plastic wrap and freeze up to 3 weeks.)
Bake the rolls.
Bake until the rolls are bursting at the seams and golden brown, 18 to 20 minutes.
(If frozen, bake 25 minutes at 325 degrees F, then 10 minutes at 375 degrees F.)
Remove from the oven and brush with softened butter.


Sprinkle with salt and serve immediately.


Very soft and tasty and your house will definitely smell like a bakery.

Saturday, October 23, 2010

I have been Painting


It took us a week to get the house ready for the painting project, do the project and put the things back the way they were before....and here is the end result.
Click THIS link to see the Facebook pictures.
Enjoy !

Thursday, October 14, 2010

Roasted Beet Salad


If you like beets but have been wondering how to get the most of them then this is your answer.
I only bought 2 at Whole Foods and if I remember well they are being sold at different prices.
The taste of these 2 is pretty similar, but the colors are fantastic especially when paired.
So you just need 2 fist size beets, some cooking oil, salt, pepper, zest of 1/2 lemon and juice of 1/2 lemon and aluminum foil.
Start by preheating your oven or in my case - toaster oven -to 375 F and continue with washing your beets, then peeling them.


Place the beets on a sheet of aluminum measuring 12 to 16 inches long, then drizzle with oil and using a brush or your fingers make sure the oil is evenly distributed.


After the oil, sprinkle salt and freshly ground pepper.


I prefer coarse pepper.


The yellow color looked much better in reality but the camera just refused to capture it.


The next step is folding the edges of the aluminum foil to make an envelope or a pouch for baking.


To begin roast the beets for 1 hour, then increase the heat to 400F and cook for 45 more minutes.


If your beets are egg size, then they might be ready at the 1 hour mark.


When time is up, they will look like this...but do not let yourself be fooled by the darkened skin.


Look at the marvelous pop of color !


The beets will release juices while cooking at that will be the start of your dressing.
To it add the lemon juice and mix to blend.


Chop or cube the beets and place them in a glass bowl.


Add the lemon zest...


...then add the dressing and toss to coat.

Chill for 10 minutes then serve as is or with anything else you might like.
You will probably not stop from eating it - it is THAT good.
Enjoy !

Wednesday, October 13, 2010

Chunky Guacamole


My husband Jeff loves guacamole and if you are a fan of it too, then you really have to try it.
My recipe has something that probably none other has and if you make it you will see how good it really is.
Mine has lemon zest, not just lemon juice and it has one small shallot, not the regular 1/4 white onion.
The shallot is milder in flavor and even softer in texture than the regular onion.

Ingredients:
1 large tomato, diced small


1 shallot


1 jalapeno pepper, seeded and cut in 2
1 handful parsley or cilantro
1 teaspoon lemon zest
juice of 1/2 lemon
salt
pepper
1 avocado

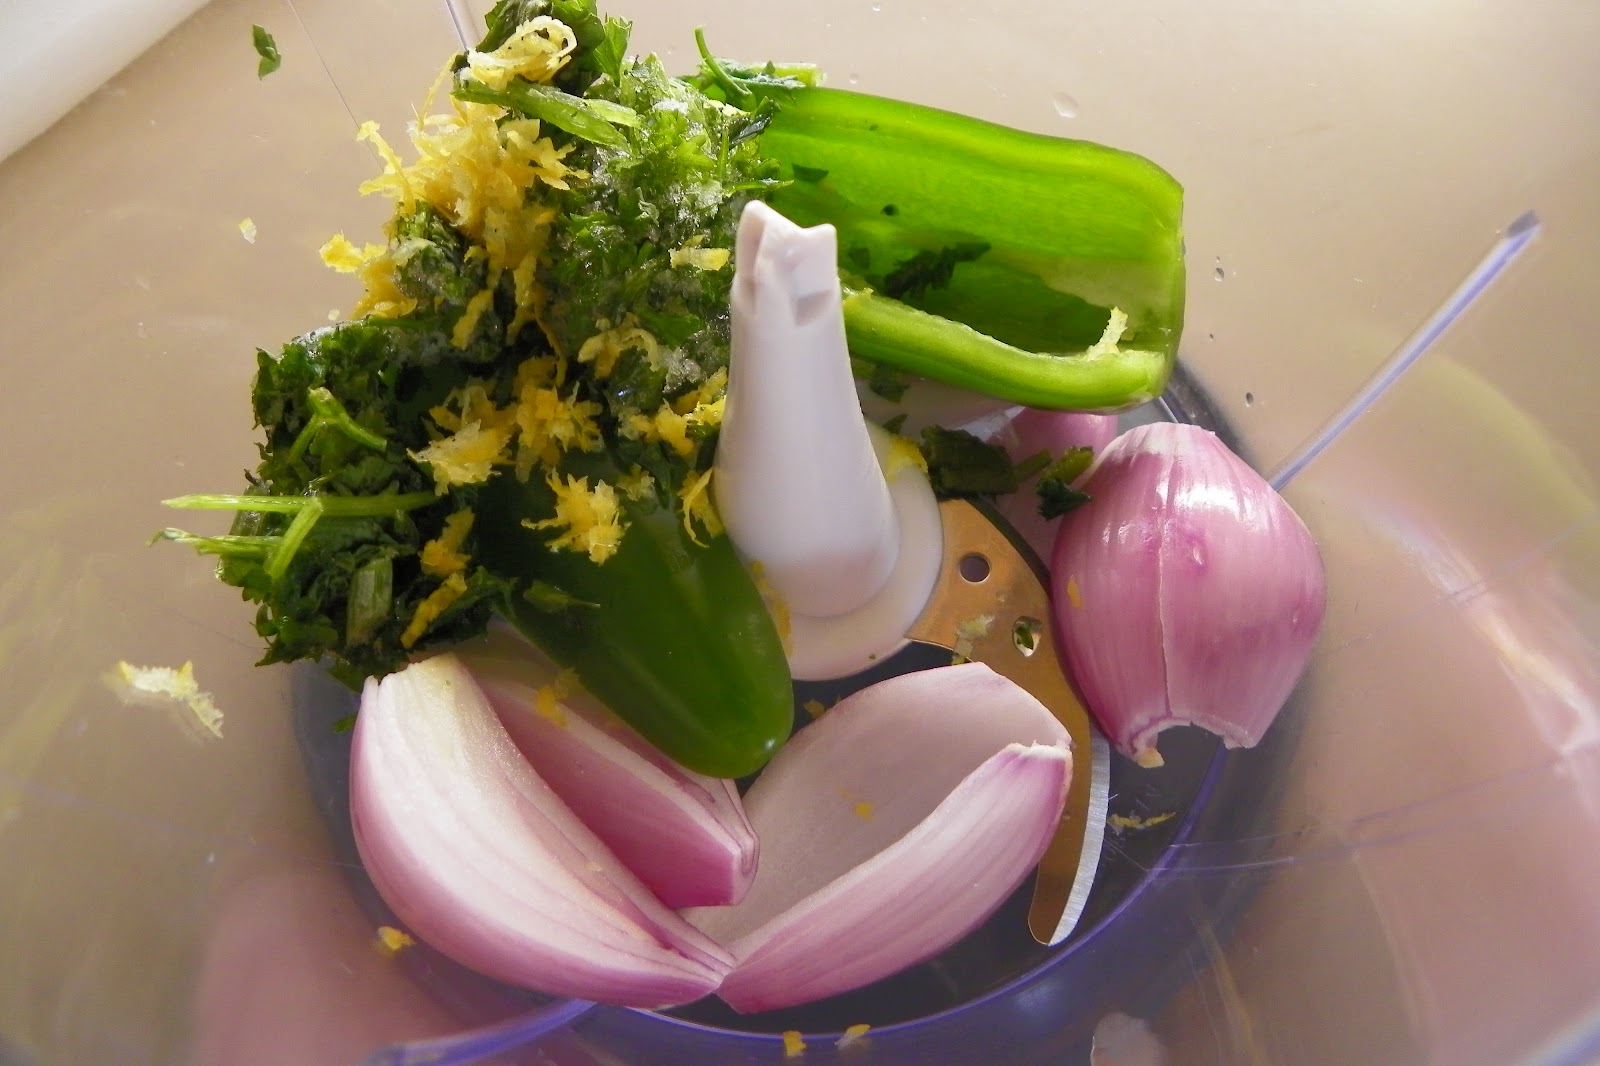
Process everything but the avocado in a small food processor until it is finely chopped.


If you find it to be too dry and separating on the sides of the food processor, then add 1/3 of the tomato quantity.


At first it will look like this.


Then with the tomato added it will turn red like this.


Before you cut the avocado make sure you have washed it thoroughly.


With a knife make a cut all the way around and then twist the halves.


Discard the large seed and scoop the contents or the pulp of the fruit into a bowl.


The perfect tool for this would be a teaspoon.


Add the mixture from the food processor and the diced tomato and mix to combine.


Check the salt & pepper taste and adjust accordingly.


The avocado oxidizes easily and the lemon juice helps prevent that from happening.


Delicious nonetheless.
Thias guacamole is best served immediately with chips, but if you want to make it ahead and chill it or just save it for later, then the best way to do that is by placing the guacamole in a plastic container with a tight fitting lid.
It will keep in the fridge for up to 2 days.
Enjoy !