Wednesday, September 1, 2010
Lime Fluff Dessert
When life gives you lemons / limes, you should probably just go ahead and squeeze them to make some refreshing lemonade.
But if you don't feel like it, you could give this dessert a go.
I am a subscriber of the Taste of Home magazine and at times I receive bonus recipes delivered to my e-mail inbox, and this Lemon / Lime Fluff is one of them.
As you will see throughout the process, I wanted to be creative with my dessert, but gave up mid-way...due to the scary green color of one of the extra ingredients that I was hoping to include.
Also, while fixing this I did learn that very cold evaporated milk can whip !!
I also know that the sweetened condensed milk, the type of milk used for key lime pies, can be cooked to obtain dulce de leche. Cannot wait to make that one !
All in all the fluff is good, but not necessarily one of my favorites.
If you have raspberries or strawberries, you could also adorn the final product to make it even more pretty.
Ingredients:
1 can (12 ounces) evaporated milk
1 package (3 ounces) lemon gelatin (I wanted to use lime gelatin at first, but realized this would end up looking like Halloween food
and decided to just use plain, unflavored gelatin instead.)
1 cup sugar
1-1/3 cups boiling water
1/4 cup lemon / lime juice
1-3/4 cups graham cracker crumbs
5 tablespoons butter, melted
one 8 oz package of cream cheese
Directions:
Pour milk into a small metal bowl; place mixer beaters in the bowl.
Cover and refrigerate for at least 2 hours.
Meanwhile, in a large bowl, dissolve gelatin and sugar in boiling water.
Stir in lemon juice.
Cover and refrigerate until syrupy, about 1-1/2 hours.
If you could not find graham cracker crumbs, then you can just place your crackers in a plastic ziplock bag and crush them with a rolling pin.
In a small bowl, combine crumbs and butter; set aside 2 tablespoons for garnish.
Press remaining crumbs onto the bottom of a 13-in. x 9-in. dish.
Beat chilled milk until soft peaks form.
Beat gelatin until tiny bubbles form.
Cream the cheese and mix it with the gelatin and then fold in the milk.
Also, if you chose to zest your citrus fruit, then this is the time to fold in the zest.
Pour over prepared crust.
Sprinkle with reserved crumbs.
Cover and refrigerate until set.
Cut into squares.
Yield: 12 servings.
Sunday, August 29, 2010
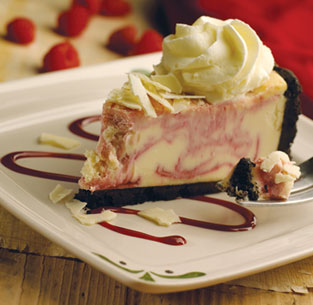
White Chocolate Raspberry Cheesecake - No Bake
If you have ever been to Olive Garden and indulged into their white chocolate cheesecake, then you will most definitely understand the need for such a recipe accessible to the home cook.
The restaurant mentioned above describes this dessert as:
" White Chocolate Raspberry Cheesecake
Raspberry-swirled white chocolate cheesecake topped with slivers of white chocolate."
Enough said and HERE is where I got the recipe from.
I shared my oh-so-good final product with the people at church today and they just loved it !
And so will you !
I used frozen raspberries and used 340 gr, a little bit more than the original recipe calls for and also used a ready made pie crust.
Ingredients:
Serves 12
For the crust:
100 gr digestive biscuits, crushed
100 gr ginger nut biscuits, crushed
100 gr butter, melted
For the filling:
500 gr (1lb 2oz) white chocolate, broken into pieces (I used chocolate chips and melted them on a double boiler)
50 gr (2oz) butter
1 teaspoon vanilla essence
500 gr (1lb 2oz) full fat soft cheese
50 gr white sugar
175 ml whipping cream
250 gr fresh raspberries, plus extra to decorate
Directions:
For the base, combine biscuits & butter, then press into the base of a 23cm (9.5") spring form tin.
For the filling, put the chocolate, butter and vanilla pod in a heatproof bowl and microwave in 20-second bursts to melt it or just set up a double boiler where you need to slowly and constantly stir until the chocolate and butter are melted.
Allow to cool slightly.
In another bowl, mix the soft cheese, sugar and whipping cream til smooth.
Stir the chocolate into the cream.
Gently stir in raspberries with a spatula, then spoon on top of the base, smooth carefully, and leave in the fridge to set (8-24 hours).
Remove from tin and decorate with raspberries and some lemon rind to serve.
If you would like to go ahead and make the version with the chocolate crust, go HERE for a recipe I found.
Enough said and HERE is where I got the recipe from.
I shared my oh-so-good final product with the people at church today and they just loved it !
And so will you !
I used frozen raspberries and used 340 gr, a little bit more than the original recipe calls for and also used a ready made pie crust.
Ingredients:
Serves 12
For the crust:
100 gr digestive biscuits, crushed
100 gr ginger nut biscuits, crushed
100 gr butter, melted
For the filling:
500 gr (1lb 2oz) white chocolate, broken into pieces (I used chocolate chips and melted them on a double boiler)
50 gr (2oz) butter
1 teaspoon vanilla essence
500 gr (1lb 2oz) full fat soft cheese
50 gr white sugar
175 ml whipping cream
250 gr fresh raspberries, plus extra to decorate
Directions:
For the base, combine biscuits & butter, then press into the base of a 23cm (9.5") spring form tin.
For the filling, put the chocolate, butter and vanilla pod in a heatproof bowl and microwave in 20-second bursts to melt it or just set up a double boiler where you need to slowly and constantly stir until the chocolate and butter are melted.
Allow to cool slightly.
In another bowl, mix the soft cheese, sugar and whipping cream til smooth.
Stir the chocolate into the cream.
Gently stir in raspberries with a spatula, then spoon on top of the base, smooth carefully, and leave in the fridge to set (8-24 hours).
Remove from tin and decorate with raspberries and some lemon rind to serve.
If you would like to go ahead and make the version with the chocolate crust, go HERE for a recipe I found.
Friday, August 27, 2010
Mixed Berries in your Pie !!
When our dear neighbor brought over 2 big bags of mixed berries, I knew I had to prepare 2 of my favorite desserts, which are berry pie with lattice topping and berry crumble, this time using Giada de Laurentiis' recipe.
I made a 6 inch pie and a 9 inch crumble.
Here is a picture of the peach crumble, and I assure you it is by far one of the best I have ever had and I have really got to try it with peach and strawberries.
I don't think I have shown you my Snoopy tshirt that I found in Italy...so here it is:
And now to get back to the berry goodness...
Ingredients for the Berry Pie:
* the berry pie resembles THIS blueberry pie recipe;
3 to 4 handfuls of mixed berries (blueberries, strawberries, raspberries, blackberries - or any other combination you like)
2/3 cup sugar
1 teaspoon citrus zest if you have
1 TBSP tapioca pearls
2 TBSP cornstarch dissolved in 1/4 cup water
1 teaspoon fresh lemon juice
Directions for the Filling:
Mix all the ingredients in a bowl and let sit for at least 30 min if the berries are fresh and for at least 2 hours if the berries are frozen.
Ingredients for the pie crust:
2 and 1/4 cups flour or 175 gr
1/2 teaspoon salt
1 TBSP sugar
1 stick of cold butter or 115 gr or 8 TBSP, cubed
1/4 cup or 60 ml cold water
Directions for the Pie Crust:
Place flour, salt, sugar in a food processor and pulse to combine, then add the butter and mix slowly until it resembles coarse meal.
Through the lid opening, with the food processor running pour the ice water and mix for just a bit until the dough just holds together.
Turn onto your work surface and knead slightly until it holds its shape.
Cover with plastic wrap and refrigerate until ready to use.
You can always double the quantities and make a 9 inch double crust pie.
While the berries are resting, line your 6 inch pie pan with 2/3 of the dough and roll the remaining 1/3 into a circle and cut strips for the lattice topping.
Preheat the oven to 400 F, then place the berries and their juices in the pie pan and top with the lattice.
Cover with aluminum foil and bake for 30 minutes covered, then remove the aluminum and bake for 30 to 40 more minutes.
Check on it occasionally and you will notice how it bubbles.
If you are worried that it might overflow, then just place the pie pan onto a baking sheet at the beginning.
Let rest for 10 minutes and enjoy.
Ingredients for the Berry Crumble:
Filling:
1 lb berries or whatever the capacity of your pie pan is
2 TBSP corn starch dissolved in 2 teaspoons lemon juice and 1/4 cup water
1/2 cup sugar or 2/3 if you like yours sweeter
Ingredients for the Topping:
1/4 cup flour
2/3 cup oats
1/2 cup sliced almonds or finely chopped almonds
1/3 cup sugar
1 teaspoon cinnamon
1/8 teaspoon salt
1 stick (1/2 cup) unsalted butter, chilled, cut into 1/2-inch cubes
Directions:
Preheat the oven to 350 degrees F.
Butter an 8 by 8-inch glass baking dish or a 9 inch pie pan. Set aside.
Mix the ingredients for the filling and pour them in the pan, then mix the ingredients for the topping and cover your berries.
Shake the pie pan a bit to make sure the topping is evenly distributed, then place in the oven and bake for 45 minutes.
Let cool for 10 minutes and enjoy !
Tuesday, August 17, 2010
My Friend's Wedding on July 4th 2010 (Ana & Alin Iacobovici)
Recently my husband and I went to Europe for a number of reasons among which was my friend's wedding.
Since I got back I did not have a chance to show you the wedding pictures, so here they are, along with some explanations here and there.
She opted for a different, shorter type of dress, no veil and it suited her personality wonderfully.
Hope you will enjoy the pictures and let me know what you thought of the dress and any other things you might spot.
The day before the wedding my friend wanted me to come over and try on her dress so she would have an idea how it looks when worn, and here I am !
No, I'm not really going to stab her....just fooling around. No worries !
Yes, here I am, wearing her dress:
This is at the church, right after the ceremony ended.
Unfortunately, it started to rain just as everyone was coming out from the church...
The next stop was the reception location where we partied until 6 am !!!
Look at the lovely bridal set !
Here is the "one of a kind" or "one of each" trio:
Look at those feathers !
Yes, my brown rose had its own feathers as well....
Here you can see my sister, my husband and I:
My sister and her boyfriend, the bride's brother and I:
The happiest couple of them all:
The cake was absolutely delicious - a tiramisu cake.
I'd like to know how you liked these.
Enjoy !!
Oh, these last two uploads are from the bachelorette party which also lasted until 6 am !
Monday, August 9, 2010
Cinnamon Cinnamon-y Brioche Loaf
A brioche loaf is usually brown and crusty on the outside and soft on the inside, it is warm, puffy and the pieces you pull slowly from the slice you just cut are just wonderful.
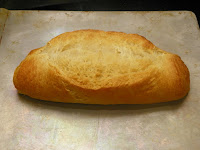
This picture below is of my regular brioche.
Sorry for not posting a picture of a slice of the dark rich color of this awesome cinnamon brioche loaf.
But there is something that tops that now.
Something a million times better.
I promise you.
It is called cinnamon infused brioche loaf.
When you bite into it you will feel like you died ans gone to Heaven - trust me.
It is one of my own personal creations for my wonderful husband and now it is unveiled here for you to try and enjoy.
Ingredients:
500 gr flour
1 TBSP cinnamon
1/4 teaspoon almond extract
10 gr instant yeast
1/2 cup milk
1/2 cup orange juice
2 eggs, beaten
1/2 cup chocolate sprinkles (Jimmies)
2/3 cup sugar (you can use Splenda)
6 tbsp butter, room temperature
1/2 teaspoon salt
1 egg yolk or a few TBSP of milk combined with some sugar - for glaze
3 tbsp brown raw sugar for topping
Directions:
Dissolve the yeast into the milk, then add the rest of the ingredients, making sure you add the salt at the end.
It is believed that having salt in direct contact with the yeast - kills the yeast and you do not want that.
Knead 10 to 20 minutes minutes and let rest for 35-60 minutes.
Punch it down and pat it so you can flatten it.
Roll the dough and place it into a greased loaf pan, 5 by 10 inches if possible.
If you are not sure that only greasing the loaf pan will help with the removal of the brioche at the end, then use either parchment paper or waxed paper.
However, Alton Brown says that waxed paper will burn.
Keep in mind that the brioche will double, even triple in volume.
Let it rise for at least 45 more minutes.
Glaze it and bake at 350 F for 30-40 minutes.
If it starts to brown too quickly, cover with aluminum foil.
When the loaf is cooked through, it should sound hollow when you knock on it.
Make sure the pan is placed in the middle of the oven.
After the baking time, let the brioche sit in the pan for approx. 5 minutes, then remove it and let it cool on a cooling rack.
Keeps well in a ziplock plastic bag, at room temperature or in the fridge.
I sliced my loaf after I had a few slices and froze it and when I want to enjoy a slice, then I just microwave every slice for 12 seconds on each side, then toast it for about 1 minute on high in your toaster oven.
Look how nicely it rose and baked !
If allowed to proof and rise for long enough, then the final baked loaf will be puffy and not at all flat.
Friday, August 6, 2010
My new Favorite Website
This is it:
http://www.dailywritingtips.com/
my new favorite website that I am happy to share with you all.
Check it out and let me know how much it has helped you by they time you are done reading the information provided by the authors.
Also, if you care for tests or if you are just curious how you will do one one of them, check them out here:
http://www.dailywritingtips.com/tests/
Have fun !!
Subscribe to:
Posts (Atom)